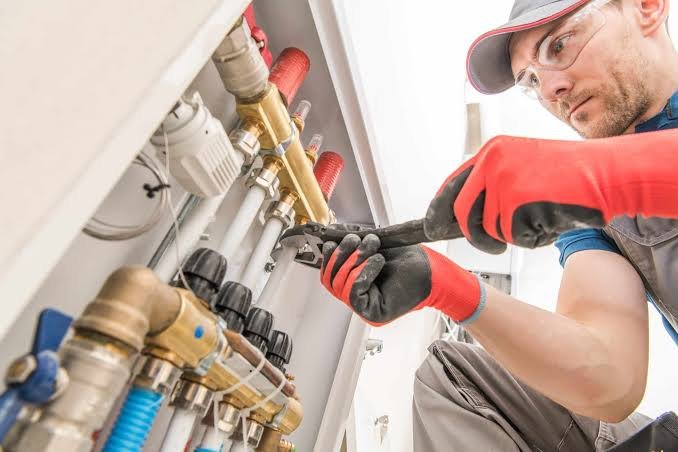
How to Bleed a Radiator Without a Key (And the One Mistake You Must Avoid)
It’s the first cold snap of the year. You’ve switched the heating on, but one radiator is gurgling, and it’s stone cold at the top. You know it’s trapped air. You search the drawer for that little silver key… and it’s gone. Don’t panic.
This is a common problem, and while the fix is simple, doing it wrong can damage your radiator or, worse, shut down your boiler.
This expert guide will show you three safe ways to how to bleed a radiator without a key using common household tools. Most importantly, I’ll show you the non-negotiable final step that most other guides forget, ensuring your heating works perfectly.
First, Are You Sure It’s Trapped Air? (The 1-Minute Diagnosis)
Before you reach for any tools, you need to be certain that trapped air is the problem you’re trying to fix. Bleeding a radiator that doesn’t need it can cause other issues, like lowering your system pressure.
The Telltale Signs You Need to Bleed Your Radiator
Check for these classic symptoms:
- Gurgling or bubbling noises coming from inside the radiator or pipes.
- The radiator is hot at the bottom but stone cold at the top. This is the number one sign of trapped air, as air rises above the hot water.
- The whole radiator is cold. This might be trapped air, but it’s more likely a different issue, like a stuck Thermostatic Radiator Valve (TRV).
What “Cold at the Bottom” Means (And Why Bleeding Won’t Fix It)
If your radiator is hot at the top but cold at the bottom, you have the opposite problem. This is not trapped air.
This is almost always a sign of radiator sludge—a build-up of rust and debris that has settled at the bottom of the rad, blocking the flow of hot water. Bleeding the radiator will not fix this. This problem requires a chemical flush or powerflush of your central heating system, which is often a job for a professional.
What You’ll Need: Your “No-Key” Toolkit
Once you’ve confirmed you have trapped air (cold at the top), gather your supplies. You only need a few things:
- A flathead screwdriver (check the bleed pin first)
- An Allen key / hex key (if you have a hex socket)
- Needle-nose pliers (for “last resort” use only, which I’ll explain)
- An old towel or rag to protect your floor
- A small bowl, mug, or yoghurt pot to catch the water
CRITICAL STEP 1: Identify Your Radiator’s Bleed Valve
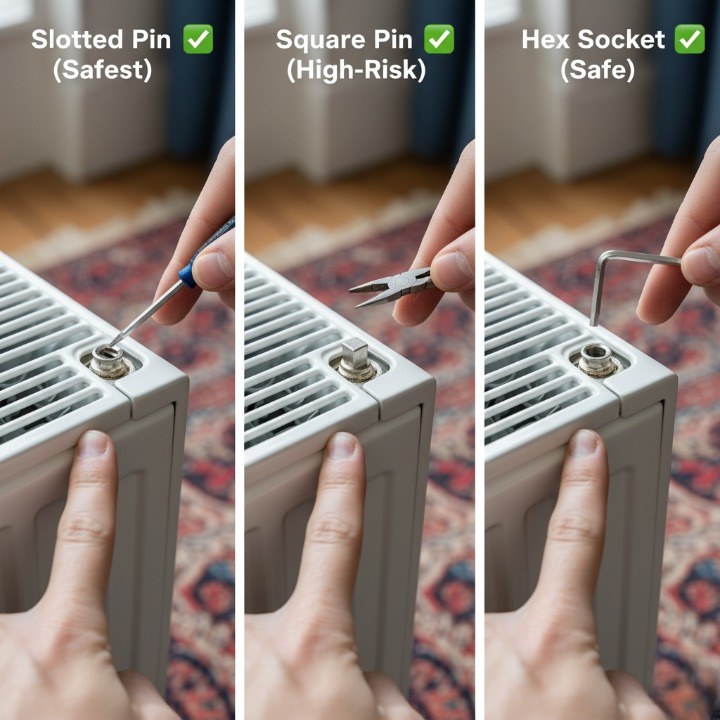
Stop. Do not just grab a pair of pliers. You must match the tool to the valve. Using the wrong tool is the fastest way to damage the pin, turning a 5-minute fix into an expensive repair.
Look at the end of your radiator. You’ll see the bleed valve. In the very centre of it is a small pin. Look closely at its shape.
Type 1: The Slotted Pin (Safest Option)
This is what you hope to see. The pin has a simple slot, just like a standard flathead screw. This is designed to be opened with a screwdriver.
Type 2: The Square Pin (High-Risk Option)
This is a small, square-shaped peg. This is what a standard radiator key is designed to fit. Your only “no-key” option here is pliers, but this is highly risky.
Type 3: The Hex Socket (Safe Option)
Some modern or designer radiators have a hexagonal (six-sided) indent, like the top of a bolt. An Allen key (or hex key) will fit this perfectly.
How to Bleed a Radiator Without a Key (Ranked Safest to Riskiest)
You’ve identified your valve and got your tools. Now, let’s do this safely.
Before You Start: Turn Off Your Central Heating
You must turn your central heating off at the thermostat or boiler. There are two crucial reasons for this:
- It stops the pump from circulating water and air around the system, allowing the air to settle at the top of the radiators.
- It allows the water in the radiators to cool down. The water that dribbles out can be scalding hot and is often black and dirty.
Let the system cool for at least 20-30 minutes before you start. As the [experts at British Gas] advise, this is a key safety step.
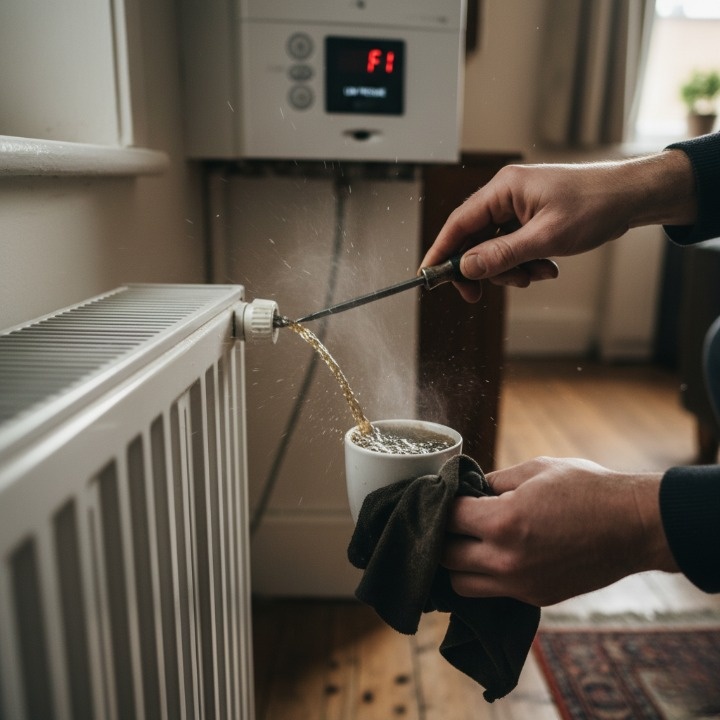
Method 1 (Safest): Using a Flathead Screwdriver
If you have the slotted pin (Type 1), this is your best option.
- Tuck your old towel under the valve to protect your carpet or floor.
- Hold your mug or bowl directly under the valve’s opening.
- Fit the flathead screwdriver firmly into the slot.
- Turn slowly anti-clockwise. A quarter to a half-turn is usually all you need.
- You will immediately hear a hissing sound. This is the trapped air escaping.
- The hissing will stop, and a steady trickle of water will come out. As soon as this happens, immediately turn the screwdriver clockwise to close the valve. Be firm, but do not overtighten it.
Method 2 (Safe): Using an Allen Key (Hex Key)
If you have the hex socket (Type 3), the process is just as easy.
- Place your towel and bowl.
- Find the Allen key from your set that fits snugly into the socket.
- Follow the exact same steps as Method 1: Turn slowly anti-clockwise, listen for the hiss, and close the valve clockwise as soon as water appears.
Method 3 (LAST RESORT): Using Pliers on a Square Pin
If you have the square pin (Type 2), you must proceed with extreme caution.
[Common Mistake Callout Box]Warning: This is your last resort. The bleed pin is made of very soft brass. Pliers are designed to crush and grip. It is extremely easy to “round off” the square edges of the pin.
If you do this, you may never be able to bleed that radiator again without replacing the entire valve. A rounded pin can’t be properly closed (causing a permanent leak) or may be impossible to open next time.
If you have no other option, use the “Gentle Grip” Technique:
- Use needle-nose pliers for the most control.
- Grip the pin with just enough force to get purchase. Do not squeeze.
- Turn very slowly anti-clockwise. The tiniest movement (even 1/8th of a turn) is often enough.
- The moment you hear the hiss, stop turning.
- Close it gently clockwise as soon as water appears.
Troubleshooting: What to Do if the Bleed Valve is Stuck
Sometimes, the problem isn’t the key; it’s the valve itself. Here’s how to handle common “stuck valve” issues.
Problem: The Valve is Painted Over
This is common in freshly decorated rooms. The paint creates a seal, gluing the pin in place.
- Solution: Take a utility knife or craft knife. Carefully score the paint in the screwdriver slot (or around the square pin) and around the edge where the pin meets the valve body. This will break the seal and allow it to turn.
Problem: The Valve is Rusted or Seized
On older radiators, rust or mineral deposits can seize the valve.
- Solution: Apply a small amount of penetrating oil (like WD-40) only to the pin. Let it sit for 10-15 minutes to work its way in. Wipe off all excess oil before trying to turn it (gently!).
Problem: The Pin is Already Stripped or Damaged
If a previous owner has already rounded off the pin with pliers, you’re in a tough spot.
- Solution: Stop. Do not try to force it. At this point, any more force will likely shear the pin off, causing a major leak. You will need to call a professional. As the Chartered Institute of Plumbing and HES (CIPHE) always advises, never force a valve or fitting. It’s time to call in a pro to replace the bleed valve.
The NON-NEGOTIABLE Final Step: Check Your Boiler Pressure
You’ve bled the radiator. The hissing has stopped, the valve is closed, and you’ve wiped up. You’re finished, right?
Wrong.
This is the most important step, and it’s the one almost every other guide forgets.
Why Bleeding Radiators Lowers Your Boiler Pressure
Your central heating is a sealed system. It’s pressurised to allow the hot water to circulate efficiently.
When you bleed a radiator, you let air out. But you also let a small amount of water out. This causes the pressure in the entire system to drop.
If the pressure drops too low (below 1 bar), your boiler will detect it as a fault and shut down as a safety measure. You’ll often see an error code like “F1” or “F22” on the display. You will have fixed the cold radiator but broken your entire heating system.
How to Check Your Boiler’s Pressure Gauge
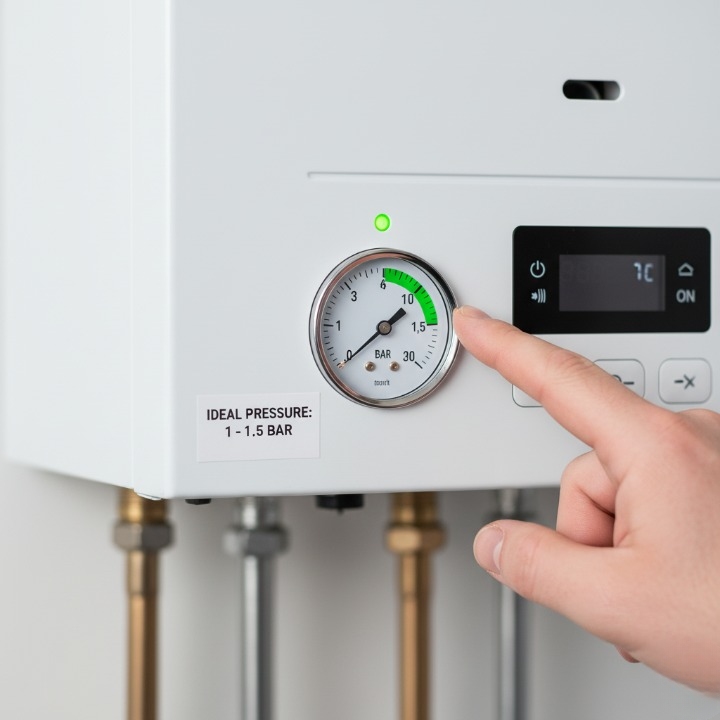
- Go to your boiler.
- Look for the pressure gauge (manometer). It’s a small dial, often on the front or underside, with numbers 0-4 and green and red zones.
- With the heating OFF, the needle should be in the green zone.
- As a rule of thumb, the ideal pressure is between 1 and 1.5 bar. [British Gas states this] as the standard for most modern systems.
- If your gauge is now reading below 1 bar (or in the red zone), you must re-pressurise it.
How to Re-Pressurise Your Boiler Using the Filling Loop
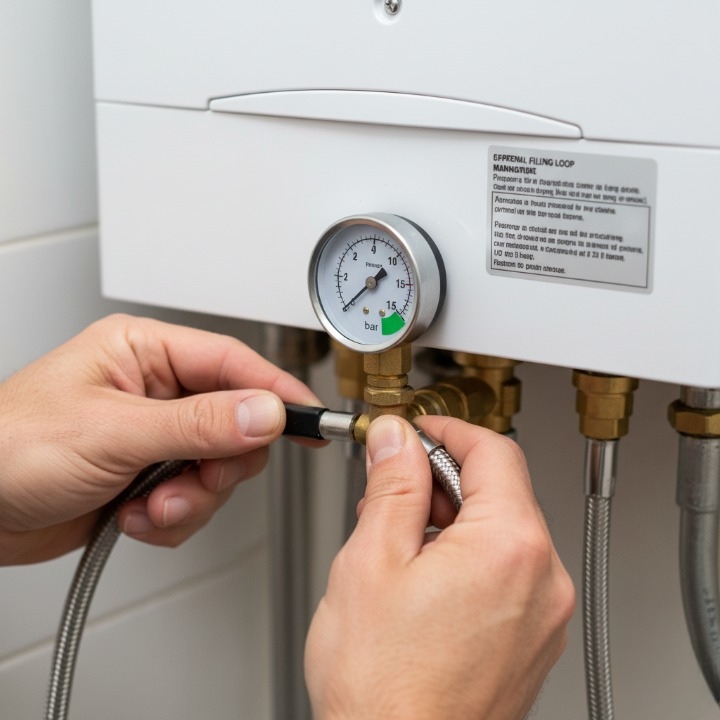
Don’t worry, this is easy. Underneath your boiler, you’ll find the filling loop. It’s usually a short, silver-braided hose with one or two small levers (they can be black, blue, or red).
- Locate the filling loop.
- Open the levers slowly. You may need to open two. You will hear the sound of water rushing into the system.
- Watch the pressure gauge as you do this. You will see the needle start to rise.
- As soon as the needle is back in the green zone (aim for 1.5 bar), close the levers immediately.
That’s it. You have now safely bled your radiator and re-stabilised your entire heating system. You can now turn your central heating back on.
[Pro-Tip Callout Box]Pro-Tip: Over-pressurising is also bad for the system. If you accidentally let the pressure go too high (e.g., past 2.5 bar), don’t panic. Just go back to the radiator you bled, open the valve slightly, and let a little water out. Watch your boiler gauge (you may need a second person) and close the valve when the pressure drops back to 1.5 bar.
Conclusion: A Warm Home (And a Happy Boiler)
Not having a 50p radiator key doesn’t have to mean living with a cold house. By following these steps, you can safely and effectively bleed your radiators and keep your home warm.
When to Call a Gas Safe Registered Engineer
This DIY guide covers the most common scenario. You should call a professional if:
- The bleed valve is badly damaged, stripped, or rusted shut.
- You bleed the radiator, but the valve won’t close properly and continues to leak.
- You find yourself having to bleed your radiators every few weeks. This is a sure sign you have a leak somewhere in your central heating system that needs a Gas Safe registered engineer to find and fix.
Your Key Takeaways
- Cold top = trapped air (bleed it). Cold bottom = radiator sludge (don’t bleed it).
- Always identify your valve before choosing a tool.
- A flathead screwdriver or Allen key is the safest “no-key” method.
- Pliers are a high-risk last resort that can easily damage the soft brass pin.
- Always check and re-pressurise your boiler using the filling loop after you’ve finished. This is the non-negotiable step to prevent your boiler from shutting down.
Final Thought
By using the right tool for your valve and—most importantly—remembering to check your boiler pressure, you’ve not just fixed a cold spot; you’ve serviced your heating system like a pro.
Was this guide helpful? Share it with a friend who’s always losing their radiator key! Or, check out our next guide on how to balance your radiators for a perfectly warm home.
FAQs
What can I use if I don’t have a radiator bleed key?
You can often use a flathead screwdriver if your valve has a slotted pin. Some radiators also use a hex (Allen) key. As a last resort, you can use needle-nose pliers on a square pin, but this is very risky as you can easily damage the soft brass.
Can you bleed a radiator with a flathead screwdriver?
Yes, but only if the bleed pin has a slot in it designed for a screwdriver. Look at your valve first to check. If it’s just a square peg, a screwdriver will not work.
Can you bleed a radiator when the heating is on?
No, you must turn your central heating off and let the radiators cool down. This stops the pump from circulating air and prevents you from being scalded by hot water.
Why is my radiator cold at the bottom?
This is not caused by trapped air. A radiator that is hot at the top but cold at the bottom is a classic sign of radiator sludge (a build-up of rust and debris). This requires a system flush, not bleeding.
What happens if I bleed my radiator for too long?
You will let too much water out of the system. This will cause your boiler’s system pressure to crash, and the boiler will shut down with an error code. Only bleed until the hissing stops and water appears, then check your boiler pressure.
What size is a radiator bleed key?
Most standard UK radiator bleed keys are a 5mm square, but this is not universal. Older or designer radiators can vary, which is why checking your valve and using an alternative tool can be so effective.
How do I know when I’ve finished bleeding a radiator?
You are finished when the hissing sound stops completely and a steady, consistent trickle of water comes out of the valve (with no sputtering air bubbles). Close the valve immediately at this point.
Do I need to check my boiler pressure after bleeding radiators?
Yes, absolutely. This is the most critical step. Bleeding lets air and water out, which lowers the system pressure. You must check your boiler’s gauge and use the filling loop to top the pressure back up to 1-1.5 bar.