How to Change a Smoke Alarm Battery: The Complete 2025 UK Guide (Even if it’s Still Chirping)
It’s 3 AM. A relentless chirp… chirp… chirp from the landing jolts you awake. That high-pitched, intermittent beep is one of the most annoying sounds in any home, but it’s also a critical warning.
That chirp is your smoke alarm’s low-battery signal, and ignoring it puts your home and family at risk. The London Fire Brigade states you are at least twice as likely to die in a fire if you don’t have a working smoke alarm. Protecting your home isn’t just about having an alarm; it’s about knowing it has power.
This is not just a basic guide. We will show you how to change the battery in every type of UK smoke alarm (battery-only, hard-wired, and sealed units). We’ll also cover what to do if the chirping doesn’t stop and explain the specific legal responsibilities for UK landlords and tenants in 2025.
First, Identify Your Smoke Alarm (This Is the Most Important Step)
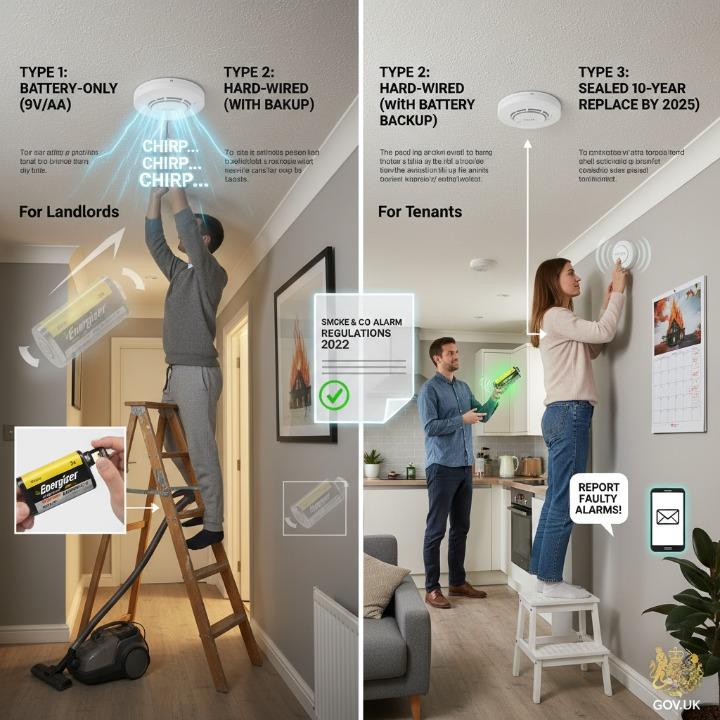
Before you grab a ladder, you must know what you’re dealing with. Trying to open a sealed unit or forgetting to cut the power to a hard-wired one can lead to frustration and damage. UK homes have three main types of smoke alarms.
Type 1: Battery-Only (9V or AA)
This is the most common, basic alarm.
-
How to Identify: It’s a simple, self-contained plastic unit. It has no wires running into the ceiling and no permanent lights. It is fully powered by a removable battery, usually a 9V square battery or a set of AAs.
-
Best for: Easy DIY replacement. The “chirp” means it’s time for a new battery.
Type 2: Hard-Wired / Mains-Powered (with Battery Backup)
These alarms are wired directly into your home’s electricity.
-
How to Identify: The key giveaway is a small, solid green light on the unit. This light shows it’s receiving mains power. It also has a backup battery inside, which is what chirps during a power cut or when the backup battery itself gets low.
-
Best for: These are common in new builds and rental properties, as UK building regulations often require them.
Type 3: Sealed 10-Year “Tamper-Proof” Alarm
This is a complete, sealed unit.
-
How to Identify: It will often have “10-Year” or “Sealed Battery” printed on the front. You will not see an obvious battery compartment or removal slot.
-
The “Chirp” Meaning: If this alarm chirps, it is at its end-of-life. The entire unit must be replaced. You cannot change the battery. The chirp is your signal to buy a whole new alarm.
How to Change the Battery in a 9V (Battery-Only) Smoke Alarm
This is the most straightforward fix. Follow these steps precisely to get it done in under five minutes.
-
Get Your Supplies You will need a stable stepladder, a new 9V battery, and your vacuum cleaner with its soft brush attachment.
-
Open the Alarm Place your ladder on a stable, flat surface. Climb up and firmly grip the main body of the alarm. Twist it counter-clockwise (to the left, like opening a stiff jar) about 15 degrees. It should detach from the mounting bracket on the ceiling.
Common Mistake: It Won’t Twist!
If the alarm doesn’t budge, don’t force it. You’ll risk breaking the plastic.
Here’s the fix: Look for a small, single-slot screw head or a plastic tab near the seam. Many Aico or FireAngel models have a tamper-proof lock to stop tenants or children from removing them. Gently push a small flathead screwdriver into this slot to release the lock, then twist it counter-clockwise.
-
Replace the Battery The alarm will likely hang by a short wire. You’ll see the 9V battery clipped into two terminals. It might be a stiff connection, so pull it off firmly. Clip in your new 9V battery.
-
Clean the Alarm (The Step Everyone Skips) Before you close it, this is the perfect time to prevent false alarms. Dust and small insects are the #1 cause of random 2 AM alarms.
Use your vacuum’s soft brush attachment to gently clean the inside sensor chamber and all the vents around the alarm. This ensures air can flow freely and only smoke will trigger it.
-
Close and Test Align the grooves on the alarm with the ones on the mounting bracket. Twist the alarm clockwise (to the right) back onto the bracket until it clicks into place.
This is the final, crucial step: Press and hold the ‘Test’ button for 5-10 seconds. You must hear the full, deafeningly loud alarm—not just a single chirp. If you hear the full alarm, the job is done.
How to Change the Battery in a Hard-Wired (Mains) Smoke Alarm
Changing the backup battery in a hard-wired alarm is easy, but it involves an extra, non-negotiable safety step. Remember, this unit is connected to your home’s 240V electricity.
-
SAFETY FIRST: Turn Off the Power Go to your fuse box (consumer unit). Find the circuit breaker that controls your smoke alarms or the lighting circuit for that floor. Flip the breaker to the OFF position.
-
Confirm Power is Off Go back to the alarm. The small green light must be OFF. If that green light is still on, you have flipped the wrong breaker. Do not proceed until that light is off.
-
Remove the Alarm Use the same counter-clockwise twist method as the 9V alarm. Once it’s off the bracket, it will hang by a small “wiring harness” that connects it to your home’s mains power.
-
Disconnect the Wiring Harness This harness is a small plastic plug with a clip on the side. Squeeze the sides of the clip and gently pull the plug apart. The alarm is now completely free and safe to handle.
-
Replace the Backup Battery Find the battery compartment. It’s often on the back or under a small flap, and it’s almost always the same 9V clip as a battery-only model. Swap the old battery for a new one.
-
Reconnect and Re-mount Clip the wiring harness back together. It only fits one way, so you can’t get it wrong. Align the alarm and twist it clockwise back onto its mounting bracket.
-
Turn the Power On Go back to the fuse box and flip the breaker back to the ON position.
-
Test the Alarm Return to the alarm. The green light should reappear, showing the mains power is back. Now, press and hold the test button. This tests both the new backup battery and the mains power connection.
The Ultimate “Pro-Tip”: Choose the Right Battery (Alkaline vs. Lithium)
When you buy a replacement 9V battery, you have two main choices. This decision is the difference between doing this job every year or once a decade.
Standard Alkaline 9V (e.g., Duracell)
-
Pro: They are cheap and you can buy them anywhere.
-
Con: They last 12-18 months at best. This is the battery that causes the 3 AM chirp. You are guaranteeing you’ll be back up that ladder next year.
9V Lithium (e.g., Energizer Ultimate Lithium)
-
Pro: They last 5-10 years, often for the entire remaining useful life of the alarm itself. You can “fit it and forget it.”
-
Con: They cost more upfront (around £7-£10 vs £2 for alkaline).
Expert Verdict: For the extra £5, a lithium battery saves you years of hassle and low-battery anxiety. We strongly recommend it for all battery-powered and hard-wired backup alarms. It’s the best “peace of mind” investment you can make.
SOLVED: Why Is My Smoke Alarm Still Chirping With a New Battery?
This is the single most frustrating home maintenance problem. You’ve done everything right, you put in a brand new battery, and the alarm still chirps every 60 seconds.
Do not throw it at the wall. The fix is usually simple.
Problem 1: You Need to Reset the Alarm’s Processor
This is the fix for 9 out of 10 cases. The alarm’s processor still holds a small “residual charge” that makes it think the old, low battery is still in. You need to fully drain it.
-
The Fix: Take the new battery out. With the battery removed, press and hold the Test button for 15-30 seconds. This drains all the leftover charge and forces a hard reset. Now re-insert the new battery. The chirping should be gone.
Problem 2: The Sensor is Dusty
If the reset doesn’t work, the chirp might be a “fault” signal, not a “low battery” signal. This is often caused by dust or a tiny spider inside the sensor chamber, which the alarm interprets as a problem.
-
The Fix: As we covered, remove the alarm and give it a thorough cleaning with your vacuum’s soft brush attachment. Pay special attention to all vents and the central sensor chamber.
Problem 3: The Alarm is Expired (End-of-Life)
If it’s still chirping, your alarm is likely finished. All smoke alarms expire. Look on the back or side of the unit for a “Replace By” or “Manufactured” date printed on the plastic.
-
The Fix: If the alarm is over 10 years old, a new battery won’t save it. GOV.UK Fire Safety Guidance confirms that all alarms should be replaced every 10 years. The sensor degrades and becomes unreliable. The entire unit must be replaced.
UK Fire Safety Law: Your Responsibilities (2025 Update)
Knowing how to change a smoke alarm battery isn’t just good sense—it’s often a legal requirement. The rules are different for landlords and tenants.
For Landlords in England & Wales
You have a clear legal duty of care. Under The Smoke and Carbon Monoxide Alarm (Amendment) Regulations 2022, you are legally required to:
-
Ensure at least one working smoke alarm is installed on every storey of your property that is used as living accommodation.
-
Repair or replace any faulty alarm “as soon as reasonably practicable” once you are notified of a problem.
RoSPA (Royal Society for the Prevention of Accidents) clarifies that this includes fixing or replacing alarms with low batteries if a tenant reports it. Failure to comply can result in fines.
For Tenants
Your responsibility is to be the “eyes and ears” of the property.
-
You are responsible for testing your alarms regularly. The London Fire Brigade recommends testing them once a month by pressing the test button.
-
You are typically responsible for replacing the batteries in battery-operated alarms. This is considered a “tenant-like” duty.
-
You must report a faulty hard-wired or sealed (10-year) unit to your landlord or letting agent immediately in writing.
FAQs (People Also Ask)
Why is my smoke alarm chirping even with a new battery?
This is almost always a “residual charge” issue. Remove the new battery, then press and hold the test button for 15-30 seconds to fully reset the alarm. Re-insert the battery, and the chirping should stop. If it continues, the sensor may be dusty (vacuum it) or the alarm has reached its 10-year end-of-life.
How often should I change my smoke alarm battery in the UK?
If you use standard Alkaline (9V or AA) batteries, you must replace them once every year. If you use a Lithium 9V battery, it can last 5-10 years, often for the remaining life of the alarm. All alarms, regardless of battery, should be tested monthly.
Can you change the battery in a sealed 10-year smoke alarm?
No. These units are “tamper-proof,” and the battery is designed to last the full 10-year lifespan of the alarm. If a sealed unit is chirping, it means it is expired and the entire alarm must be replaced.
How do I change the battery in a hard-wired (mains) smoke alarm?
First, turn off the power at your fuse box. Twist the alarm to remove it, check that the green power light is OFF, and disconnect the wiring harness. You can then access and replace the backup battery (usually a 9V). Reconnect everything, turn the power on, and test it.
What’s the difference between a 9V Alkaline and a 9V Lithium battery for a smoke alarm?
An Alkaline battery is cheaper but only lasts 12-18 months, leading to the yearly “low battery” chirp. A Lithium battery costs more upfront but lasts 5-10 years, saving you hassle and ensuring more reliable, long-term protection.
How do I stop a smoke alarm from chirping if I don’t have a new battery right now?
You can temporarily silence the chirp by removing the battery (and disconnecting the harness if it’s hard-wired). However, this is extremely dangerous as it leaves you unprotected. You must buy and install a new battery as soon as possible.
What does a green light on my smoke alarm mean?
The green light indicates that your hard-wired (mains-powered) smoke alarm is correctly receiving power from your home’s electricity. If this light is off, it means the power is out or the circuit breaker has tripped.
Do I need to replace the whole smoke alarm or just the battery?
You only need to replace the battery if the alarm is less than 10 years old. All smoke alarms (battery, hard-wired, or sealed) must be replaced every 10 years. Check the “replace by” date printed on the side or back of your alarm.
Your Home is Safe – Now Keep it That Way
That midnight chirp is your cue to act. You now know how to handle every part of the process like an expert. Remember the three-step fix: Identify your alarm type (9V, hard-wired, or sealed), Replace the battery (using Lithium for a 10-year fix), and Test to ensure it’s working.
A smoke alarm is the single most important piece of safety equipment in your home. The five minutes it takes to change a battery, or the £20 it costs to replace an expired unit, is the best investment you can make for your peace of mind.
Don’t wait for the chirp. Go and press the test button on all your smoke alarms right now.