How to Bleed a Radiator: The Simple Step-by-Step Guide for UK Homes
It’s a classic British problem. You hear the heating click on during the first proper cold snap, but one room stays stubbornly chilly. You feel the radiator: hot at the bottom, stone-cold at the top.
You’ve got trapped air. This common issue is the #1 cause of gurgling noises, inefficient heating, and—most importantly—higher energy bills. When your radiators are full of air, your boiler has to work much harder to heat your home, and you’re paying for energy that never even warms the room.
The good news is, this is one of the easiest, safest, and most satisfying 5-minute DIY jobs you can do. This guide will walk you through every single step. We won’t just show you how to bleed the radiator; we’ll show you the critical final step most guides forget (checking your boiler pressure) to ensure your entire system runs perfectly.
Why (and When) Should You Bleed Your Radiators?
Your central heating system works by pumping hot water through your pipes and into your radiators. Over time, small amounts of air can get into this sealed system, or dissolved air in the water can be released. Because air rises, it gets trapped at the top of your radiators, stopping the hot water from filling them.
You only need to bleed your radiators when you notice the tell-tale symptoms:
-
Cold spots at the top of the radiator, while the bottom is hot.
-
Gurgling, bubbling, or “kettling” noises coming from your pipes or radiators as water tries to flow past the trapped air.
-
The radiator takes a much longer time to heat up than other radiators in the house.
If you have any of these symptoms, it’s time to bleed them.
The 3 Simple Tools You’ll Need for the Job
You don’t need a plumber or a full toolkit for this. It’s one of the few home maintenance jobs that requires only a couple of things, one of which costs about £1.
-
A Radiator Key: This is the only “specialist” tool. It’s a small, square-topped key designed to fit the bleed valve. You can buy one from any DIY store like B&Q or Wickes or online for a pound or two.
-
A Cloth or Old Towel: This serves two purposes: to protect your hand from the key (which can be small and fiddly) and to catch any drips.
-
A Bowl or Jug: An old yogurt pot, mug, or small bowl is perfect for catching the small amount of water that will come out.
How to Bleed a Radiator: A 5-Step Guide
Here is the simple, step-by-step process. The most important part is the preparation in step 1.
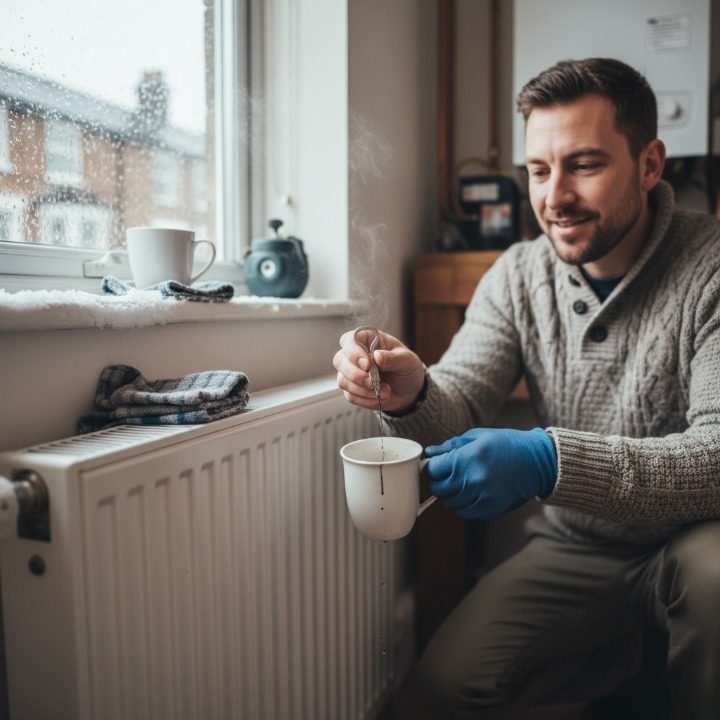
Step 1: Turn Off Your Central Heating (And Wait!)
This is the most important safety step. Turn your central heating off completely at the thermostat or boiler. This stops the pump from circulating water and ensures the water inside the radiators isn’t scalding hot.
Common Mistake: Don’t Get Impatient
Don’t just turn the heating off; wait at least 30 minutes for the system to cool down. Trying to bleed a hot radiator will, at best, scald your hand. At worst, it will spray boiling, dirty water across your carpets and walls. Patience is key.
Step 2: Protect Your Floor & Locate the Bleed Valve
Lay your old towel on the floor beneath the bleed valve to protect your carpet or flooring.
The bleed valve is almost always located at the top corner of the radiator. It looks like a small, round component with a square “nut” in the centre. Hold your bowl or jug directly underneath the valve to catch the water.
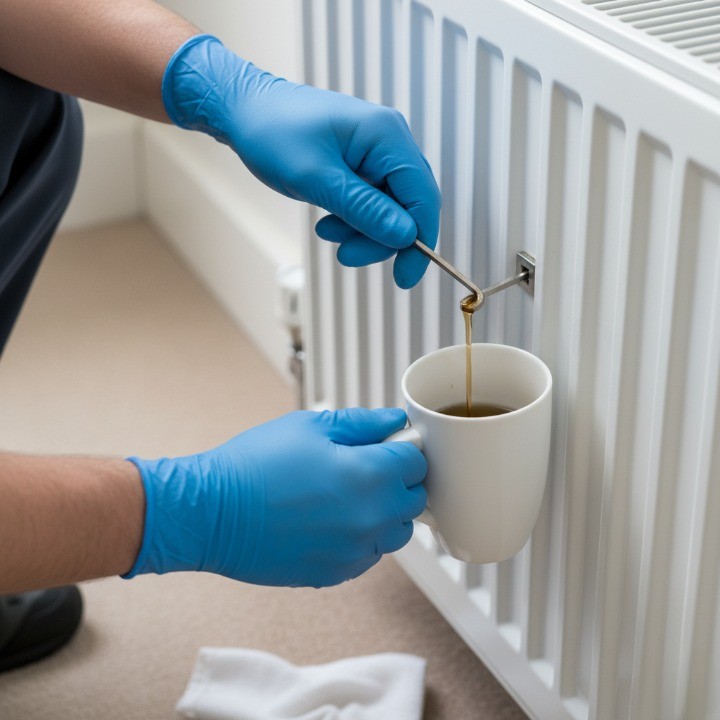
Step 3: Insert the Key & Slowly Turn (Listen for the Hiss)
Fit your radiator key onto the square nut in the valve. Grip it firmly with your cloth (to protect your knuckles) and slowly turn it anti-clockwise.
Pro-Tip: A Gentle Touch is All You Need
You only need to turn the key a tiny amount—a quarter-turn is often enough. You will immediately hear a hissing sound. This is the trapped air escaping.
Many first-timers open the valve too far, and a jet of water follows the air, making a mess. A slow, gentle turn is all you need. Don’t be alarmed by the hiss; it’s exactly what you want to hear.
Step 4: Catch the Water & Close the Valve
Keep the key in place and listen. The hissing sound will continue for a few seconds, and then it will change to a gurgle as water starts to follow the air.
As soon as a steady, consistent dribble of water comes out, all the air is gone.
Use your cloth to quickly turn the key clockwise to close the valve. Be firm and nip it “hand-tight,” but don’t overtighten it, or you could damage the valve. Wipe away any drips with your cloth.
You might notice the water is black or dirty. Don’t worry—this is very common. It’s just a sign of rust and sludge (called magnetite) from inside the system. We’ll cover this more in the troubleshooting section.
Step 5: Turn Heating On & Check Your Work
Once you’ve closed the valve, you can turn your central heating back on. Wait 15-20 minutes, then go and feel the radiator. It should now be pleasantly hot all the way to the top.
But you’re not quite finished. There’s one more critical step.
The Critical Final Step Most Guides Forget: Your Boiler Pressure
This is the “content gap” that elevates our guide. We’ve just solved the problem after the problem.
Why Bleeding Radiators Lowers Boiler Pressure
Your combi boiler system is a sealed system. By “bleeding” it, you’ve just released air and a small amount of water. This causes the overall pressure in the system to drop.
If the pressure drops too low (below 1.0 bar), your boiler may not work efficiently, or it might cut out completely, leaving you with no heating at all.
How to Check Your Boiler Pressure Gauge (The “Green Zone”)
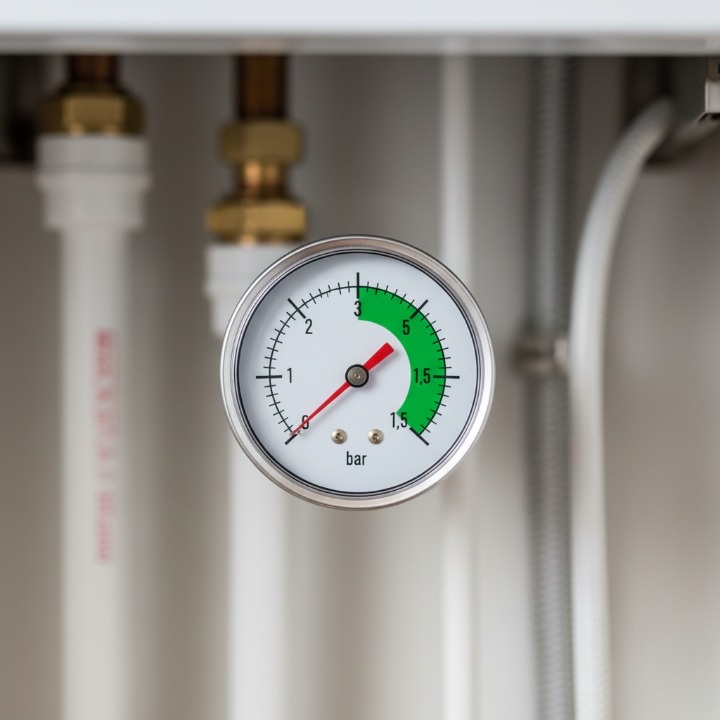
Go to your combi boiler. On the front, you will see a small, round dial called a pressure gauge (or manometer).
This gauge almost always has a “safe zone” marked in green, which is typically between 1.0 and 1.5 bar (when the heating is off). If your needle has dropped below 1.0 bar and is in the red zone, you must top it up.
How to Re-Pressurise Your Boiler Using the Filling Loop
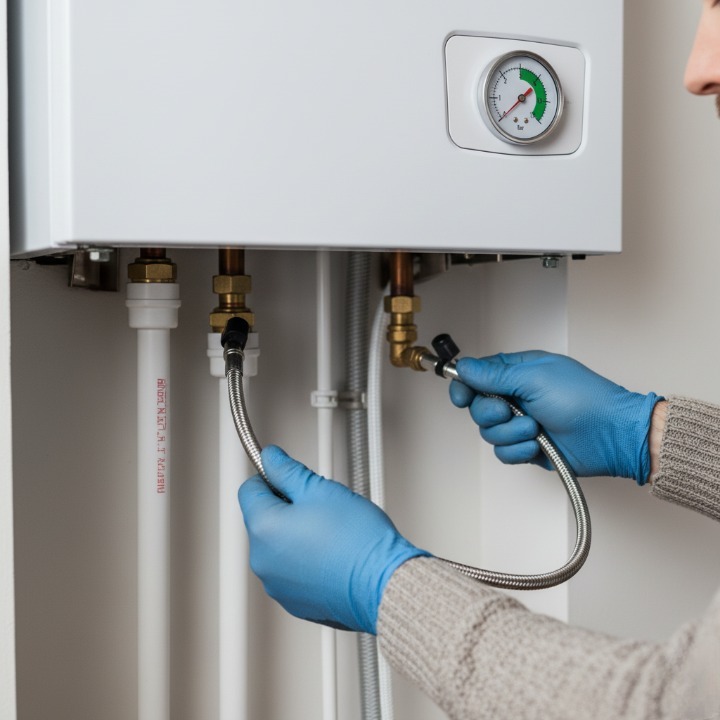
This sounds technical, but it’s designed for homeowners to do. Look underneath your boiler. You will see a small, silver, braided hose with one or two small taps (they often have blue or black plastic levers). This is the filling loop.
-
Locate the taps. There is usually one on each end of the filling loop.
-
Slowly open one tap. You may need to turn it a quarter-turn.
-
Slowly open the second tap. You will immediately hear the sound of water flowing.
-
Watch the pressure gauge. Keep your eyes on the needle. You will see it start to rise.
-
Close the taps. As soon as the needle enters the green zone (aim for 1.5 bar), securely close both taps, one after the other.
That’s it. You have successfully re-pressurised your boiler. Your central heating system is now balanced, efficient, and ready for winter. As experts at British Gas advise, keeping your pressure correct is key to a healthy heating system.
Expert Troubleshooting: What If My Radiator Is Still Cold?
Sometimes, bleeding doesn’t solve the problem. Here’s what to do next.
Problem: The Radiator is Still Cold at the Top
This is a simple one. It just means you had a lot of trapped air in that radiator. You likely closed the valve too soon.
Solution: Simply repeat the process. Turn the heating off, wait for it to cool, and bleed it again (Steps 1-4). This time, wait until you have a very steady, clear stream of water before closing the valve.
Problem: The Radiator is Cold at the Bottom (or in the Middle)
This is a completely different issue. If your radiator is hot at the top but cold at the bottom, this is not an air problem. Bleeding it 100 times will not fix it.
This is a sign of sludge (a thick, black build-up of rust and dirt) that has sunk to the bottom and is blocking the flow of water.
Solution: This is not a simple DIY fix. The solution is a professional “power flush,” where an engineer uses chemicals and high-pressure water to clean out your entire system. If you have cold-at-the-bottom radiators, it’s time to call a heating engineer].
Expert Tips & A Note for UK Tenants
What order should I bleed my radiators?
If you’re just bleeding one problematic radiator, you don’t need to worry about order.
But if you’re doing a whole-house check (e.g., in autumn), there is a “pro” method. Start on the ground floor with the radiator that is furthest from your boiler. Work your way back towards the boiler. Then, move upstairs and repeat the process, finishing with the radiator closest to the boiler on the top floor (like a bathroom towel rail).
This just helps push all the air through the system in a logical way before it can get trapped elsewhere.
A Quick Note for Tenants
Bleeding radiators is generally considered a simple, routine maintenance task, like changing a lightbulb, that most tenants can and should do themselves.
However, you are not expected to be a heating engineer. If you are not comfortable doing this, if you don’t have a radiator key, or if the problem is with the boiler pressure, contact your landlord or letting agent. They are responsible for ensuring the heating system is in good working order, as per Shelter’s guidance on landlord responsibilities. If the problem is sludge (cold at the bottom), that is absolutely your landlord’s responsibility to fix.
Your Home Is Now Ready for Winter
Bleeding your radiators is a fast, effective DIY task that anyone can do. By fixing those cold spots and gurgling pipes, you’re not just making your home more comfortable; you’re making your heating system more efficient and saving money on your energy bills.
Taking 10 minutes to do this before winter really sets in can save you a world of hassle. It’s the difference between a heating system that fights the cold and one that’s ready for it. Now that your heating is running perfectly, why not learn how to set your boiler thermostat for maximum efficiency?
FAQs
What order should I bleed radiators in a 2-storey house?
Start on the ground floor with the radiator furthest from the boiler. Work your way back, then move upstairs and repeat, finishing with the radiator closest to the boiler on the top floor.
Can you bleed a radiator when the heating is on?
No. This is dangerous and ineffective. You will be sprayed with very hot water, and the pump’s circulation can actually pull more air into the system. Always turn the heating off and wait for it to cool down first.
What do I do if I don’t have a radiator key?
Check the bleed valve first. Many modern valves also have a small slot in the centre, allowing you to use a standard flathead screwdriver. In a pinch, a pair of pliers can work on older valves, but be extremely careful not to damage the soft metal, which could cause a leak.
Why is my radiator still cold after bleeding it?
This is the key question. If it’s still cold at the top, it may need bleeding again. If it’s cold at the bottom, you have a sludge build-up. Bleeding will not fix a sludge problem; you will need to contact a professional for a power flush.
What happens if I turn the radiator valve too far?
Don’t panic! Water will just start to come out more quickly. This is why you have the towel and bowl ready. Simply turn the key clockwise again to close it. It’s very difficult to “break” it this way.
How often should I bleed my radiators?
There’s no set schedule. You only need to do it when you notice the symptoms—gurgling sounds or cold spots at the top. For most people, this is once a year, usually in autumn before you start using the heating regularly.
Why is the water from my radiator black?
This is very common and nothing to be alarmed about. The black water is just a mix of rust and other particles (sludge/magnetite) from the inside of your pipes and radiators. It’s not dangerous, but if the water is very thick and black, it’s a strong sign your system would benefit from a chemical flush.
What should my boiler pressure be after bleeding radiators?
After you are all finished, and with the heating off, your boiler pressure gauge should be in the green zone. This is typically between 1.0 and 1.5 bar. If it’s below 1.0 bar, you must re-pressurise it using the filling loop.