Thread Alignment Tool: The Specialist’s Guide to Perfect Muzzle Precision
There is no sound more sickening to a gunsmith or precision shooter than the “ping” of a baffle strike.
It represents an immediate, catastrophic failure. In a split second, a £500 sound moderator is ruined, and potentially, a match-grade barrel is destroyed. The culprit is rarely the ammunition or the shooter. It is almost always geometry. A thread cut even half a degree off-axis sends the projectile on a collision course with the internal baffles of your muzzle device.
For professionals in the UK, where the use of sound moderators is standard practice for hearing protection and noise control, ensuring perpendicularity is not optional—it is a critical safety requirement.
This is where the thread alignment tool (TAT) becomes the most valuable item in your workshop. Whether you call it a die starter, a muzzle threading guide, or a pilot, its function remains the same: to bridge the gap between “good enough” and absolute zero run-out.
This guide details the technical workflow for using a TAT correctly, adhering to BS 3643-2 standards, and avoiding the common pitfalls that lead to expensive machining errors.
What is a Thread Alignment Tool (TAT)?
A thread alignment tool is a precision-engineered jig designed to hold a threading die at a perfect $90^\circ$ angle relative to the bore of a cylindrical workpiece.
While often associated with gunsmithing (specifically for threading barrels to accept brakes or moderators), the TAT is equally vital in general Maintenance, Repair, and Operations (MRO) for repairing studs or threading pipes where a lathe setup is impractical.
Die Starters vs. Thread Chasers: Know the Difference
A common misconception among DIY engineering enthusiasts is that a thread chaser can correct alignment. This is false.
- Thread Chasers/Restorers: These are designed to clean existing threads that are damaged or filled with debris. They follow the existing path. If the original thread is crooked, the chaser will simply clean a crooked thread.
- Thread Alignment Tools (Die Starters): These are for cutting new threads on a blank tenon. They physically force the die to start square. Once the first few threads are cut true, the die will naturally follow that perpendicular path.
Anatomy of a Pro-Grade Tool
Not all guides are created equal. According to 2025 specifications from UK suppliers like ANT Supplies, a professional-grade TAT typically features:
- Material: 303 Stainless Steel or 6061 Aluminium. Steel is preferred for durability, but Aluminium is often used for the pilot shaft to prevent marring the harder steel of a rifle bore.
- Pilot Shaft: A precision-ground rod (usually 1 inch long) sized to fit the bore diameter (e.g., .22 cal, .30 cal) with a tolerance of $-0.001$ inches.
- Threaded Interface: The section that screws into the die itself (common sizes include 1/2″ or 1″ OD dies).
Why Precision Matters: The “Suppressor Strike” Physics
To understand why a thread alignment tool is mandatory, we must look at the geometry of misalignment.
A sound moderator extends significantly past the muzzle—often 6 to 9 inches. A microscopic error at the thread shoulder amplifies drastically over that distance.
We can calculate the deviation ($D$) using simple trigonometry. If the thread is misaligned by an angle ($\theta$) of just $0.5^\circ$, and the suppressor length ($L$) is 8 inches ($203$ mm):
A deviation of 1.77 mm is massive in ballistics. Considering the exit hole of a moderator is only slightly larger than the bullet diameter, a 1.77 mm shift virtually guarantees the projectile will strike the end cap.
Concentricity vs. Squareness
- Concentricity: Is the thread centred on the bore axis? (Controlled by how you turn the barrel tenon).
- Squareness: Is the thread perpendicular to the bore axis? (Controlled by the thread alignment tool).
You can have a perfectly concentric thread that is tilted (not square), leading to a baffle strike. The TAT specifically ensures squareness.
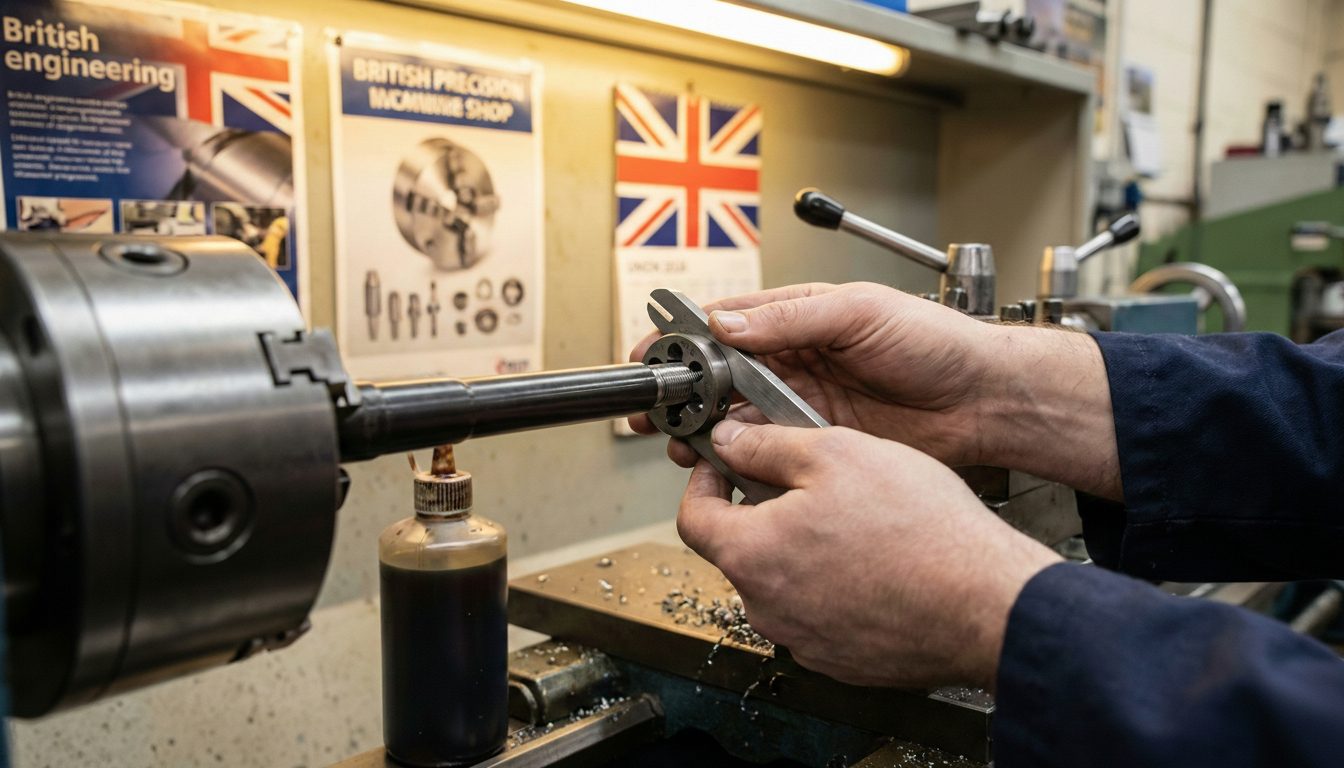
The 5-Step Workflow for Zero Run-out (Step-by-Step)
Achieving factory-level threads requires a disciplined approach. Do not skip the preparation phase.
Step 1: Bore Preparation and Cleaning
Never insert a pilot into a dirty bore. Carbon fouling, copper deposits, and unburnt powder will reduce the effective diameter of the bore, causing the TAT to bind or scratch the rifling.
- Action: Clean the muzzle end thoroughly using isopropyl alcohol or a dedicated bore solvent.
- Safety: Ensure the firearm is unloaded and the bolt is removed.
Step 2: Selecting the Right Pilot
Match the TAT pilot to your specific calibre. A loose pilot introduces “slop,” negating the tool’s purpose.
- Common UK Pairings:
-
-
.22LR / .223 Rem: Requires a .219″ – .220″ pilot.
-
.308 Win / .300 BLK: Requires a .299″ – .300″ pilot.
-
9mm: Requires a .350″ pilot.
-
Step 3: The “First Cut” – Setting Perpendicularity
- Apply a high-viscosity cutting fluid to the barrel tenon.
- Screw the threading die onto the TAT’s threaded section until it bottoms out.
- Insert the TAT pilot into the bore.
- Apply downward pressure on the die handle while turning clockwise. The TAT prevents the handles from tilting.
- Critical Moment: Once the die has cut 3 to 4 full threads, the alignment is established. You can now unscrew the TAT from the die and continue threading normally.
Step 4: Managing Chip Load
In the UK, we often machine 4140 Chrome Moly steel or 416 Stainless. These are tough materials.
- Chip Breaking: Turn the die $1/2$ turn forward, then $1/4$ turn back to break the metal chip.
- Lubrication: Use a sulphur-based cutting oil (like Rocol RTD) rather than standard WD-40. Proper lubrication reduces friction and prevents the threads from tearing.
Step 5: Final Verification
Before attaching a muzzle device, verify your work.
- Visual Check: Look for “drunken threads” (uneven spacing).
- Spin Test: Thread on the moderator. It should spin freely until it hits the shoulder. If it binds halfway down, your threads may be tapered or misaligned.
UK Engineering Standards: BS 3643-2 and Muzzle Specs
Professional machinists in the UK must adhere to recognized standards. For metric threads (e.g., M14x1, M18x1), the governing standard is BS 3643-2:2007.
Understanding “Medium Fit” 6H/6g Tolerances
For firearms and precision attachment, a “Course” fit is unacceptable due to vibration loosening the device.
- Class 6g: This is the standard tolerance for the external thread (the barrel).
- Class 6H: This is the standard for the internal thread (the moderator).
A thread alignment tool helps ensure you do not inadvertently cut an undersized thread (Class 8g) by preventing the die from wobbling and removing too much material from the crests.
Common UK Threads
When ordering your TAT and die, ensure they match the standard UK market specifications:
- 1/2×20 UNF: Standard for rimfire rifles and airguns in the UK.
- 1/2×28 UNEF: The US standard, now common in the UK on AR-15 platforms.
- M14x1: Common on Tikka and Sako hunting rifles.
- 5/8×24 UNEF: Standard for .30 calibre centerfire rifles.
Avoiding the “Bore Slop” Problem (The Specialist’s Secret)
Here is a scenario professional gunsmiths face often: You have a .303 British vintage rifle. The bore is slightly worn or oversized due to age. Your standard .30 calibre TAT feels loose inside the muzzle.
If the tool wiggles, it cannot align the die.
The “Barrel Patch” Pro-Tip
Do not force the cut with a loose tool. Instead, shim the pilot.
- Take a standard cotton cleaning patch or a thin strip of paper.
- Wrap it once around the TAT pilot shaft.
- Insert it into the bore.
- The paper acts as a concentric shim, taking up the slack ($0.001″ – 0.003″$) and ensuring the pilot sits firmly in the centre of the bore.
Note: This is an advanced field technique. ideally, you would turn a custom pilot on a lathe, but in a repair shop environment, the patch method is a recognized, safe workaround.
Troubleshooting Common Threading Failures
Even with a thread alignment tool, things can go wrong. Here is how to troubleshoot.
Galling on Stainless Steel
Stainless steel has a tendency to “gall” (cold weld) to the die, tearing the threads off.
- Cause: Lack of lubrication or dull cutting teeth.
- Solution: Use a specific compound containing Molybdenum Disulphide. Never thread stainless dry.
The “Drunken Thread”
This occurs when the die cuts a helix that wavers, rather than a straight spiral.
- Cause: Removing the TAT too early.
- Solution: Keep the TAT engaged for at least 4 full rotations. The pilot shaft provides stability against the torque of the die handles.
PUWER Compliance
Under the Provision and Use of Work Equipment Regulations 1998 (PUWER), all workshop equipment must be “suitable for the intended use.” Using a makeshift alignment method (like a visual guess) on a customer’s firearm could be deemed negligence if it leads to equipment failure. Using a dedicated TAT demonstrates due diligence and adherence to safety standards.
FAQs
Can I use an aluminium TAT on a steel barrel?
Yes. Aluminium pilots are actually preferred by many because they are softer than the barrel steel, reducing the risk of scratching the delicate crown or rifling.
How do I measure my bore diameter for a custom TAT?
Use a set of pin gauges (plug gauges). Insert them until you find the largest pin that fits smoothly. Do not use calipers at the very edge of the muzzle, as the crown is often worn or chamfered, giving a false reading.
Why is my muzzle brake “timing” off after using a TAT?
The TAT ensures the thread is straight, but it does not control where the thread starts. Timing a brake usually requires “peel washers” or crush washers to orient the ports correctly.
Do I need a TAT for single-point lathe threading?
No. If you are threading on a lathe, the barrel is indicated true to the spindle. The lathe carriage ensures the tool path is straight. TATs are strictly for manual die cutting.
What is the best cutting fluid for UK-grade 4140 steel?
High-sulphur dark oils are the industry standard. Brands like Rocol or Trefolex are widely available in UK industrial suppliers and offer superior extreme-pressure (EP) performance.
How do I clean a clogged thread alignment pilot?
Soak it in solvent and use a stiff nylon brush. Never use a wire wheel, as this can alter the precision dimensions of the pilot shaft.
Can a TAT fix cross-threaded muzzle devices?
No. If a thread is already crossed, a TAT cannot fix it. You would need to turn down the tenon to a smaller diameter and cut a new, smaller thread size (e.g., drop from 5/8″ to 1/2″).
Is it legal to thread my own barrel in the UK?
Yes, provided you have the necessary Firearm Certificate (FAC) for the rifle. However, “manufacturing” or shortening a barrel below legal limits requires specific permissions. Always consult the Firearms Act 1968 guidelines or a Registered Firearms Dealer (RFD) if unsure.
Conclusion
Precision is not about luck; it is about eliminating variables. In the high-stakes world of ballistics, a fraction of a degree is the difference between a successful range day and a destroyed firearm.
The thread alignment tool is a simple, cost-effective safeguard. By anchoring your threading die to the bore’s axis, you ensure that every turn of the handle adheres to the strict geometry required for modern suppressors and brakes.
Whether you are a professional gunsmith or a competent engineer, the rule remains the same: Respect the tolerances. Use the right cutting fluid, verify your bore diameter, and never turn a die without a pilot.
Ready to upgrade your workshop precision? Ensure your tooling meets the mark. View British Standard Thread Specifications or check the latest Muzzle Threading Tolerance Chart.