How to Remove Mould from Silicone Sealant UK: Stop Scrubbing, Start Soaking
You scrub until your arms ache. Two weeks later, the black spots are back. It is incredibly frustrating.
Our wet UK winters and poorly ventilated bathrooms create perfect conditions for deep-rooted fungal spores. The result? Ugly, black marks ruining your shower tray.
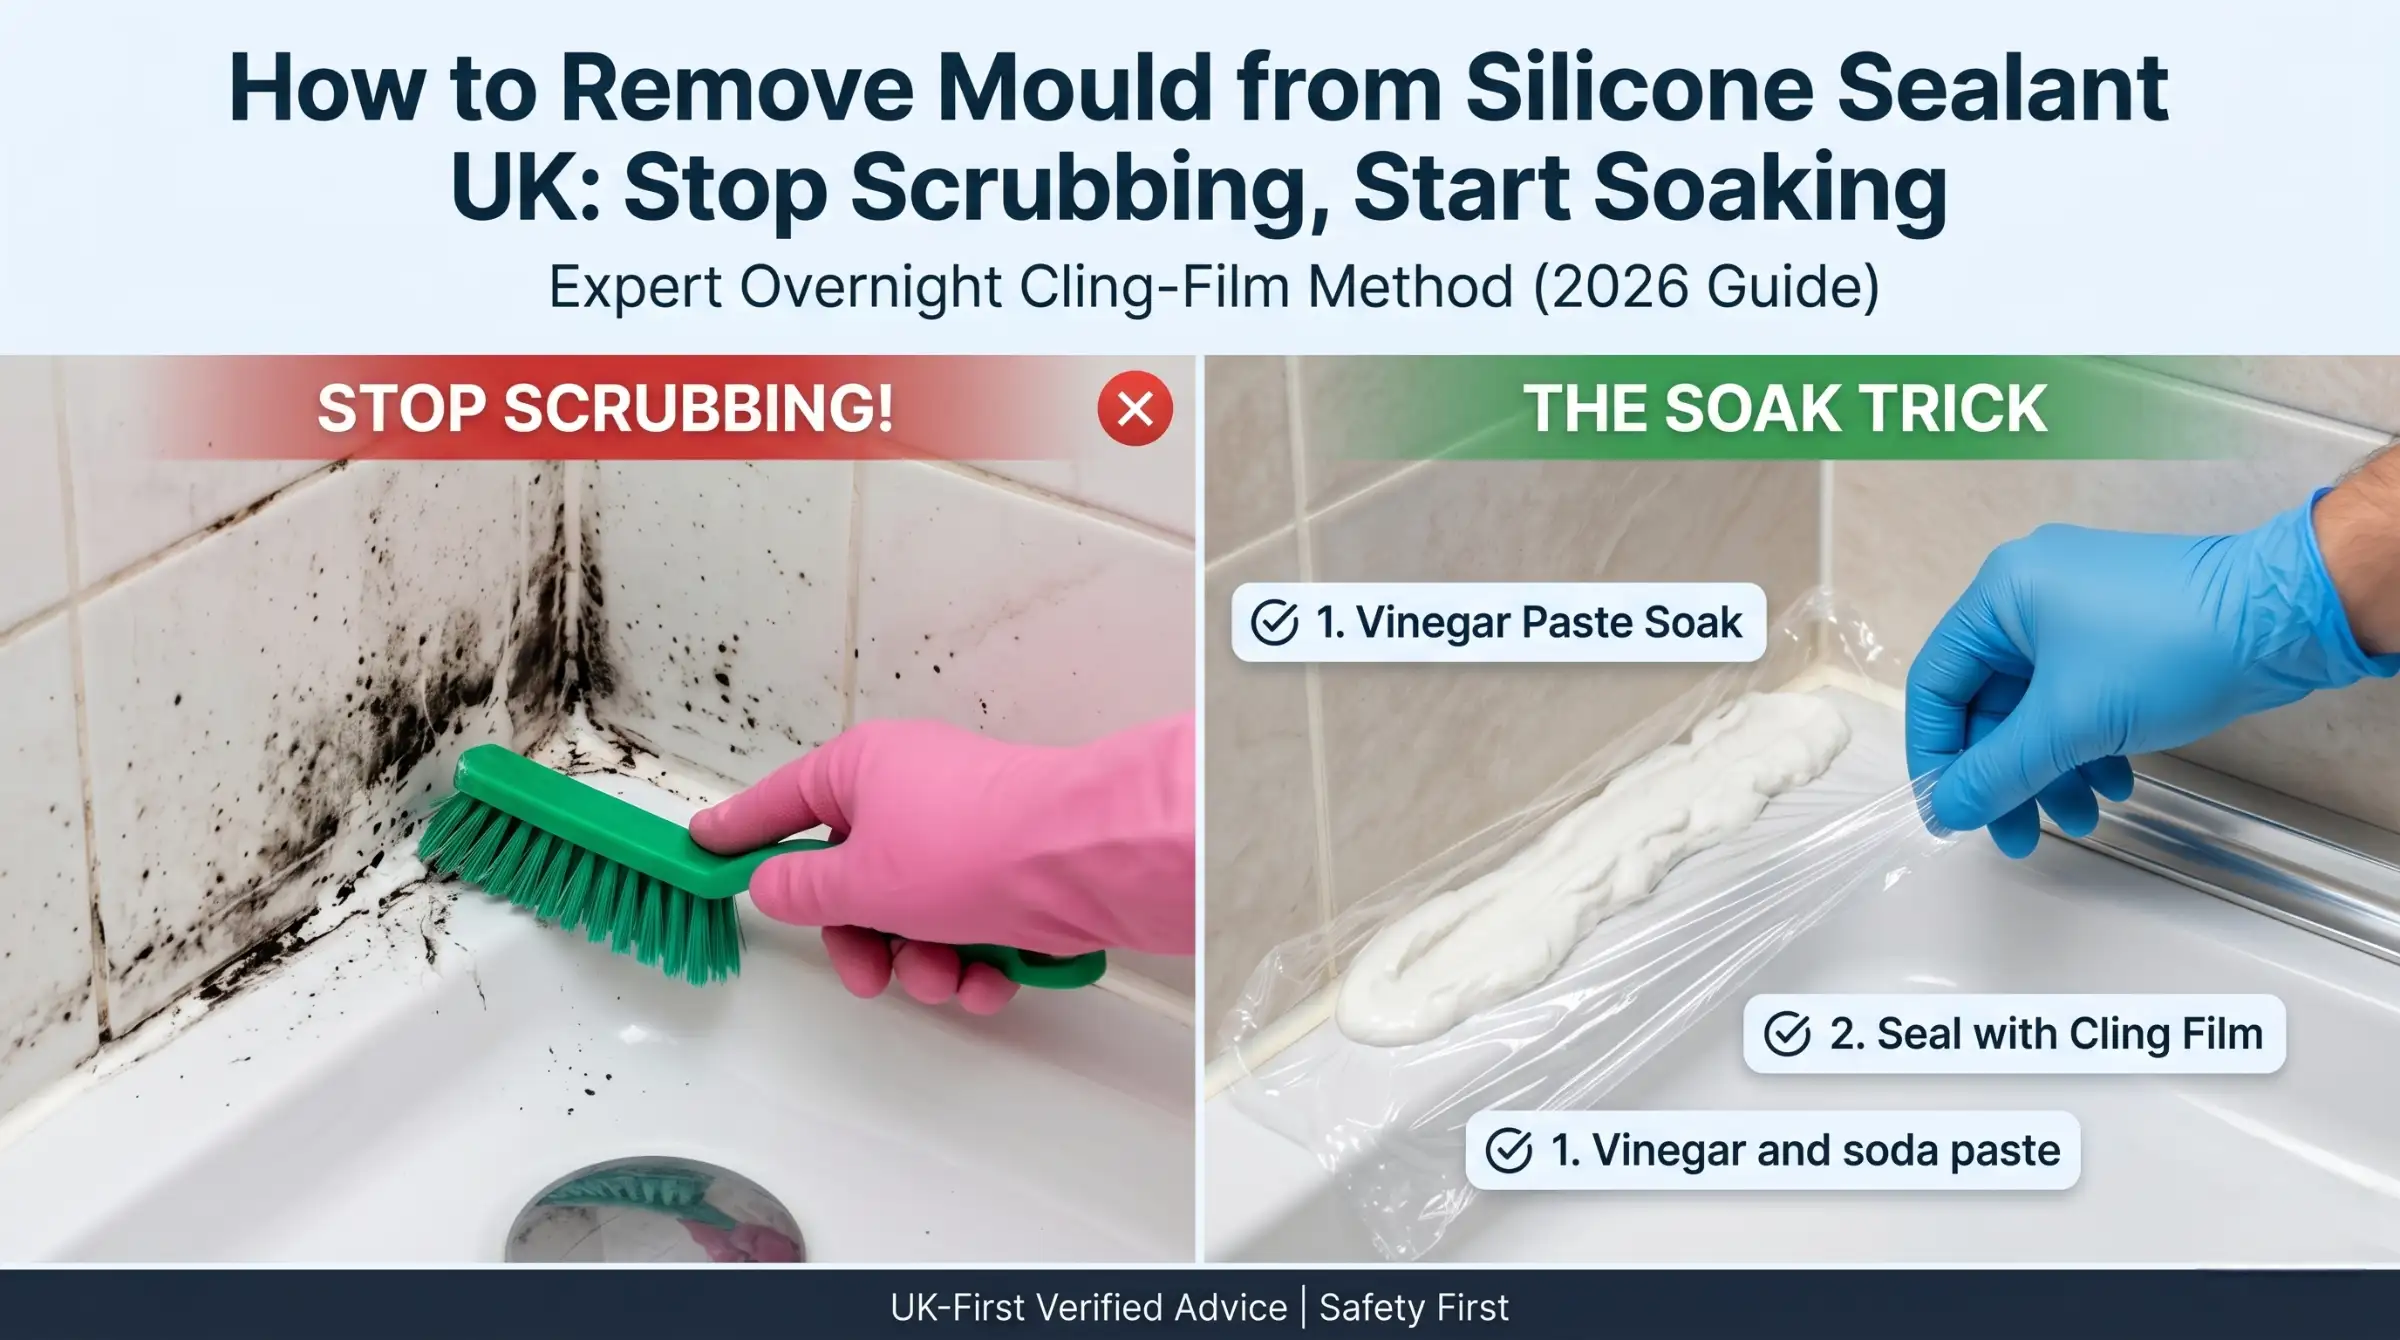
The secret is not scrubbing harder. Scrubbing actually makes the problem worse. Instead, we use an extended soak and wipe method to break down spores without damaging your waterproof seal.
To remove mould from silicone sealant in the UK without damaging it, mix a thick paste of white vinegar and bicarbonate of soda. Apply the paste directly to the black mould, cover it tightly with cling film to prevent evaporation, and leave it to soak overnight before gently wiping away.
Key Takeaways
- Aggressive scrubbing creates micro-tears where future mould hides.
- Surface-level black spots can be safely treated with everyday household items.
- Covering natural cleaning pastes with cling film stops them drying out too quickly.
- Mixing chemical cleaners like bleach and ammonia creates highly dangerous toxic fumes.
- Mould sitting securely behind the clear silicone bead cannot be cleaned and requires a full replacement.
The Golden Rule: Why You Must Stop Scrubbing
Your first instinct is to grab a hard-bristled brush. Do not do it.
Stiff brushes and heavy physical scrubbing create invisible micro-tears in the soft silicone. These tiny cuts give future fungal spores the perfect hiding place.
Pro Tip: Avoid using aggressive, hard-bristled brushes that tear the silicone. This only guarantees the damp problem will return faster next time.
Standard cleaning products often mask the issue rather than solve it. As The Mould Doctor noted in 2024, “Contrary to popular opinion, bleach, although effective in treating surface mould is not the best way to treat it…”
You need a method that penetrates the surface gently instead of tearing it apart.
Quick Start: Clean or Replace?
Before mixing any pastes, you must know if the sealant can actually be saved. Sometimes, cleaning is a complete waste of time.
If the fungal growth has penetrated deeply behind the silicone, no spray will reach it. Once black mould gets behind the bead, the sealant must be completely removed and replaced.
Common Mistake: Trying to bleach mould that lives behind the silicone. If the dark spots look trapped under a clear layer, stop cleaning immediately. You need a utility knife, not a sponge.
Here is a quick self-test to help you decide your next steps:
- Does the black mark wipe away easily with white vinegar? Clean it.
- Is the dark mould situated behind the clear bead? Replace it.
- Is the silicone peeling, cracked, or pulling away from the wall? Replace it.
- Has the stain returned less than a week after a thorough bleach treatment? Replace it.
Take a typical private tenant dealing with deep-rooted spots. They often find that aggressive scrubbing fails completely because spores have already penetrated the backing. In these cases, complete removal with a sharp utility knife and a fresh application of a sanitary silicone is the only permanent fix.
How to Remove Mould from Silicone Sealant UK (The Cling Film Method)
If your sealant passed the test, you can start the deep clean. This method takes patience, not elbow grease.
We use an overnight soak trick. Leaving a paste of white vinegar and baking soda under a layer of cling film overnight breaks down stubborn stains safely. Covering the paste traps the moisture, preventing it from evaporating. [Victorian Plumbing cleaning guide]
Pro Tip: Cover vinegar and baking soda pastes with cling film to prevent evaporation, allowing the mixture to penetrate overnight.
Follow this exact step-by-step method:
- Mix white vinegar and bicarbonate of soda into a thick, spreadable paste.
- Spread a generous layer directly over the affected areas.
- Cover the paste tightly with a layer of cling film.
- Leave it completely undisturbed overnight for maximum deep penetration.
- Remove the cling film in the morning, gently wipe away the paste with a cloth, and rinse with cool water.
Chemical vs. Natural Mould Removal: What Actually Works?
Let us look at the options. Bleach. White vinegar. Tea tree oil. Which is best?
People reach for bleach instantly. It whitens the surface fast. However, it often fails to kill the deep roots. Natural methods take longer. They require patience. But they work far better for penetrating porous materials safely.
| Treatment Type | Safety Level | Cost | Effectiveness on Silicone |
| White Vinegar | High | Low | Excellent (breaks down roots) |
| Bleach / Chemical Sprays | Low | Medium | Good (for surface stains only) |
| Tea Tree Oil | High | Medium | Excellent (natural anti-fungal) |
If you do choose strong commercial chemicals, safety is vital. You must protect yourself.
Pro Tip: If using bleach or commercial mould removers, always wear rubber gloves, safety glasses, and a face mask, and ensure windows are wide open.
Never mix your products. Pro Tip: Never mix bleach with ammonia-based household cleaners. Doing so generates highly toxic fumes in an enclosed bathroom space. [HSE guidelines on mixing cleaning chemicals]
Mid-Article Summary
- Stop scrubbing: Stiff brushes damage silicone and invite more mould.
- Soak it instead: Use a white vinegar and baking soda paste.
- Wrap it up: Cover the paste in cling film overnight to stop it drying out.
- Stay safe: Never mix bleach with ammonia, and always wear protective gear.
Alternative Natural Treatments for Stubborn Spores
Vinegar smells very strong. Some people hate it.
Try tea tree oil instead. It is a brilliant alternative. Applying tea tree oil mixed with water penetrates porous surfaces. It destroys fungal cell walls naturally without harsh fumes.
As noted by PRBG Environmental in 2026, “Tea tree oil contains natural compounds called terpinen-4-ol that destroy fungal cell walls.” Simple. Highly effective.
When Replacement is the Only Option
Sometimes, cleaning fails completely.
If mould returns rapidly after cleaning, it has likely penetrated the silicone backing. Pro Tip: Rapid return means it is replacement time, not time for another heavy scrub. You need a fresh start.
When applying new sealant, the preparation must be perfect. Pro Tip: Ensure the area is 100% dry and all old residue is entirely removed with a utility knife to ensure proper adhesion. If old sealant remains, the new bead will fail.
How to Stop Bathroom Mould Returning
Cleaning is only half the battle. Stopping it coming back is the real goal.
Consider a typical private tenant dealing with a recurring damp issue. They switched from surface-wiping with bleach to the overnight cling film soak method. Then, they upgraded their daily ventilation habit. The dark spots never returned.
Mould needs standing water to survive. Starve it.
Pro Tip: Wipe down your shower sealant with a dry microfibre cloth after every single use. It deprives the spores of the moisture they desperately need.
Airflow is just as important. Open windows immediately after bathing. Pro Tip: Upgrade your bathroom ventilation to an extractor fan equipped with a humidity sensor to automatically reduce airborne moisture. [Which? guide to the best bathroom extractor fans]
Summary
Patience beats scrubbing. Stop attacking your bathroom with hard brushes and toxic chemical mixtures. Rely on an overnight soak using white vinegar and cling film to gently draw out the stains. Protect your health, protect your silicone, and change your daily moisture habits to keep the damp away for good.
Next Steps:
- Test a small patch of sealant with the vinegar paste tonight.
- Order a specialist sanitary sealant if the black marks are trapped deep behind the bead.
- Upgrade your bathroom ventilation routine starting tomorrow.
FAQs
What is the best mould remover for silicone sealant in the UK?
White vinegar mixed with bicarbonate of soda is highly effective and safe. For commercial options, dedicated fungicidal sprays are better than standard household bleach.
Does HG mould spray damage silicone?
If used correctly and rinsed thoroughly, it is safe. However, leaving strong chemical sprays on sealant for extended periods can degrade the rubber over time.
Can I use pure bleach on bathroom sealant?
It is not recommended. Pure bleach whitens the surface but rarely kills the deep-rooted spores. It can also weaken the silicone structure if left to sit.
Why does black mould keep coming back on my shower tray?
It means the bathroom is too damp, or the fungal roots have penetrated behind the sealant bead where cleaning sprays cannot reach.
How long should I leave vinegar on mouldy silicone?
For minor stains, 30 minutes is enough. For heavy, stubborn marks, cover the vinegar paste in cling film and leave it to soak overnight.
Does WD-40 remove mould from sealant?
No. WD-40 is a water displacer and lubricant. It does not contain the necessary anti-fungal properties to kill mould and will leave a greasy residue.
How much does it cost to replace bathroom sealant in the UK?
A tube of high-quality sanitary silicone costs between £5 and £15. Hiring a tradesperson to remove the old sealant and apply a new bead typically costs between £50 and £100.
Are black mould spores in the bathroom dangerous?
Yes. Black mould thrives in wet, poorly ventilated conditions, releasing spores and irritants that can be dangerous to human respiratory health, particularly for those with asthma.